Introduction
Unfortunately there is no native support for EAP-TEAP in Group Policy Objects for Windows Server 2019 and below. There is a workaround however to use TEAP anyway. In short, we will configure TEAP on a Windows 10 Client and export the settings. This file can then be used to import the settings into a GPO. Even if they are not available for selection in the GUI.
What is TEAP
EAP is short for Extensible Authentication Protocol. Tunnel Extensible Authentication Protocol (TEAP) is a tunnel-based EAP method that enables secure communication between a peer and a server by using the Transport Layer Security (TLS) protocol to establish a mutually authenticated tunnel. EAP is used to authenticate wired or wireless devices.
Requirements
You need at least Windows 10 version 2004 (20H1). This version was released in May 2020.
You should already have a GPO which starts the 802.1x service on your client. Otherwise the Authentication tab would be missing in your interface settings. In order to make changes to you client you need to remove it from the 802.1x GPO. Before you continue make sure the client has the Root CA certificate installed. All devices which will use the TEAP GPO need the Root CA certificate as well! The 802.1x services can be started manually or using the following commands:
Wired:
net start dot3svc
Wireless:
net start WlanSvc
Generate XML File
Configure EAP-TEAP including all advanced settings to use it in your Group Policy Object later on.
Configure Interface Settings
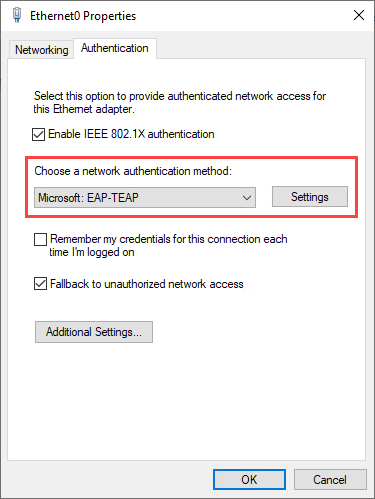
On your Windows 10 client select your network adapter by navigation to Control Panel -> Network and Internet -> Network and Sharing Center -> Change Adapter Settings. Right click your adapter and select Properties. Click the Authentication tab and select Microsoft: EAP-TEAP as an authentication method:
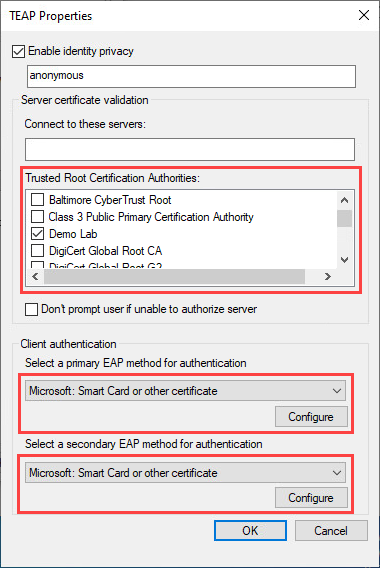
Select the Settings button next to the dropdown. In the new window select your Root CA certificate and choose Microsoft: Smart Card or other certificate in both client authentication dropdowns:
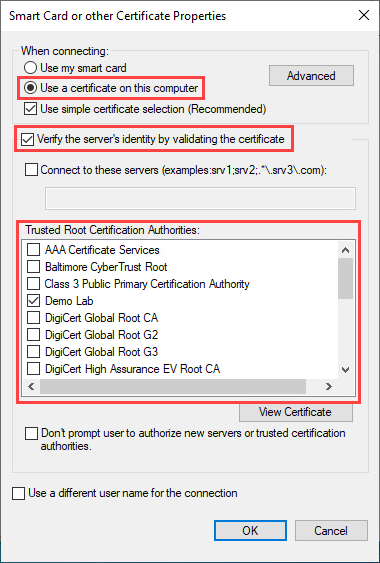
Click the Configure button below the dropdown (Repeat this step for the secondary EAP authentication method). Select Use certificate on this computer and Verify the server’s Identity by validating the certificate. Now select your trusted Root CA:
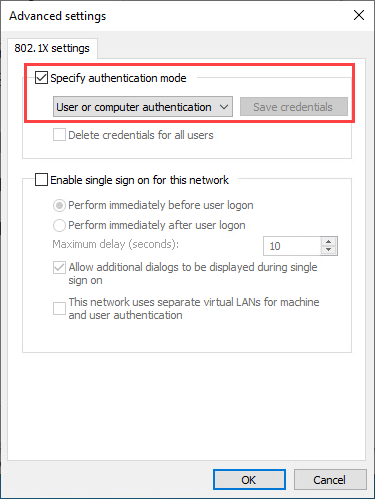
Back on the interface properties window click the Additional Settings… button. In the following window select Specify authentication mode and select User or computer authentication:
Export Interface Settings
Open a command prompt as an administrator and run to following command to view the interface name:
netsh lan show profiles
You can find the interface name at the end of the first line in your output. In my case it is Ethernet0:
Profile on interface Ethernet0
=======================================================================
Applied: User Profile

    Profile Version        : 1
    Type                   : Wired LAN
    AutoConfig Version     : 1
    802.1x                 : Enabled
    802.1x                 : Not Enforced
    EAP type               : Microsoft: EAP-TEAP
    802.1X auth credential : Machine or user credential
    Cache user information : No
Use the following command to export the interface profile:
netsh lan export profile folder=“PATH” interface=“INTERFACE_NAME”
Example:
netsh lan export profile folder=C:\temp interface=Ethernet0
Open the XML file and copy everything between <EAPConfig> and </EAPConfig>. In my case that would include the following:
<EAPConfig><EapHostConfig xmlns="http://www.microsoft.com/provisioning/EapHostConfig"><EapMethod><Type xmlns="http://www.microsoft.com/provisioning/EapCommon">55</Type><VendorId xmlns="http://www.microsoft.com/provisioning/EapCommon">0</VendorId><VendorType xmlns="http://www.microsoft.com/provisioning/EapCommon">0</VendorType><AuthorId xmlns="http://www.microsoft.com/provisioning/EapCommon">311</AuthorId></EapMethod><Config xmlns="http://www.microsoft.com/provisioning/EapHostConfig"><EapTeap xmlns="http://www.microsoft.com/provisioning/EapTeapConnectionPropertiesV1"><ServerValidation><TrustedRootCAHash>40 1e 4a a3 87 77 48 5 80 fb 97 d3 32 b5 51 e 54 9e 1e 40 c6 79 86 ea 49 c3 3e 5d 6 f1 50 1e</TrustedRootCAHash><DisablePrompt>false</DisablePrompt><DownloadTrustedServerRoot>false</DownloadTrustedServerRoot></ServerValidation><Phase2Authentication><InnerMethodConfig><EapHostConfig xmlns="http://www.microsoft.com/provisioning/EapHostConfig"><EapMethod><Type xmlns="http://www.microsoft.com/provisioning/EapCommon">13</Type><VendorId xmlns="http://www.microsoft.com/provisioning/EapCommon">0</VendorId><VendorType xmlns="http://www.microsoft.com/provisioning/EapCommon">0</VendorType><AuthorId xmlns="http://www.microsoft.com/provisioning/EapCommon">0</AuthorId></EapMethod><Config xmlns="http://www.microsoft.com/provisioning/EapHostConfig"><Eap xmlns="http://www.microsoft.com/provisioning/BaseEapConnectionPropertiesV1"><Type>13</Type><EapType xmlns="http://www.microsoft.com/provisioning/EapTlsConnectionPropertiesV1"><CredentialsSource><CertificateStore><SimpleCertSelection>true</SimpleCertSelection></CertificateStore></CredentialsSource><ServerValidation><DisableUserPromptForServerValidation>false</DisableUserPromptForServerValidation><ServerNames></ServerNames><TrustedRootCA>4b 1c dc 74 2b b2 bc 6e a8 37 c8 f1 40 fe 70 41 4b c4 d5 8a </TrustedRootCA></ServerValidation><DifferentUsername>false</DifferentUsername><PerformServerValidation xmlns="http://www.microsoft.com/provisioning/EapTlsConnectionPropertiesV2">true</PerformServerValidation><AcceptServerName xmlns="http://www.microsoft.com/provisioning/EapTlsConnectionPropertiesV2">false</AcceptServerName></EapType></Eap></Config></EapHostConfig></InnerMethodConfig><InnerMethodConfig><EapHostConfig xmlns="http://www.microsoft.com/provisioning/EapHostConfig"><EapMethod><Type xmlns="http://www.microsoft.com/provisioning/EapCommon">13</Type><VendorId xmlns="http://www.microsoft.com/provisioning/EapCommon">0</VendorId><VendorType xmlns="http://www.microsoft.com/provisioning/EapCommon">0</VendorType><AuthorId xmlns="http://www.microsoft.com/provisioning/EapCommon">0</AuthorId></EapMethod><Config xmlns="http://www.microsoft.com/provisioning/EapHostConfig"><Eap xmlns="http://www.microsoft.com/provisioning/BaseEapConnectionPropertiesV1"><Type>13</Type><EapType xmlns="http://www.microsoft.com/provisioning/EapTlsConnectionPropertiesV1"><CredentialsSource><CertificateStore><SimpleCertSelection>true</SimpleCertSelection></CertificateStore></CredentialsSource><ServerValidation><DisableUserPromptForServerValidation>false</DisableUserPromptForServerValidation><ServerNames></ServerNames><TrustedRootCA>4b 1c dc 74 2b b2 bc 6e a8 37 c8 f1 40 fe 70 41 4b c4 d5 8a </TrustedRootCA></ServerValidation><DifferentUsername>false</DifferentUsername><PerformServerValidation xmlns="http://www.microsoft.com/provisioning/EapTlsConnectionPropertiesV2">true</PerformServerValidation><AcceptServerName xmlns="http://www.microsoft.com/provisioning/EapTlsConnectionPropertiesV2">false</AcceptServerName></EapType></Eap></Config></EapHostConfig></InnerMethodConfig></Phase2Authentication><Phase1Identity><IdentityPrivacy>true</IdentityPrivacy><AnonymousIdentity>anonymous</AnonymousIdentity></Phase1Identity></EapTeap></Config></EapHostConfig></EAPConfig>Create Group Policy Object
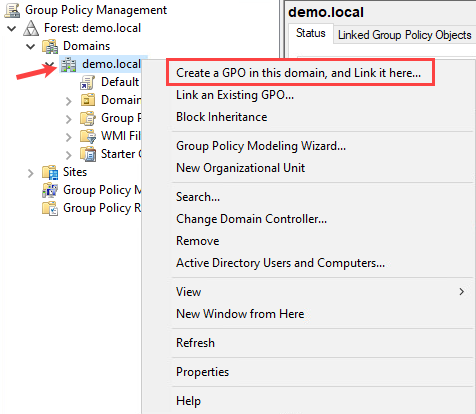
Open your Group Policy Management on your Domain Controller. Because this is a lab environment I will create the policy at domain level. You can choose an Organizational Unit of course. Select your domain or OU and click Create a GPO in this domain, and Link it here…:
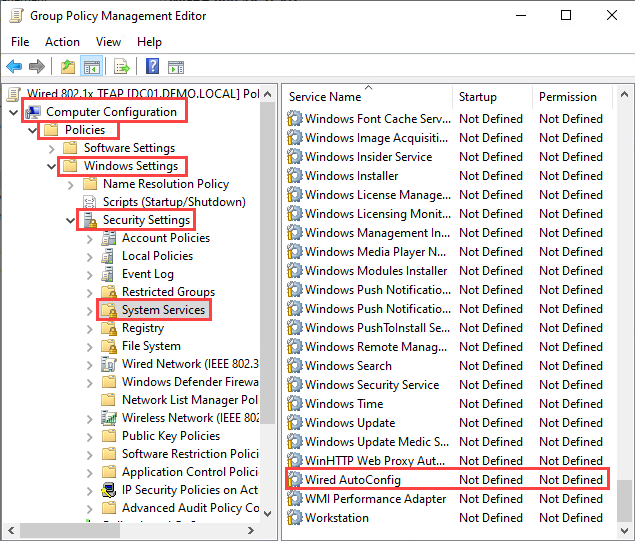
Name the GPO and right click on the newly created policy and select Edit. Navigate to Computer Configuration -> Policies -> Windows Settings -> Security Settings -> System Services and select Wired AutoConfig:
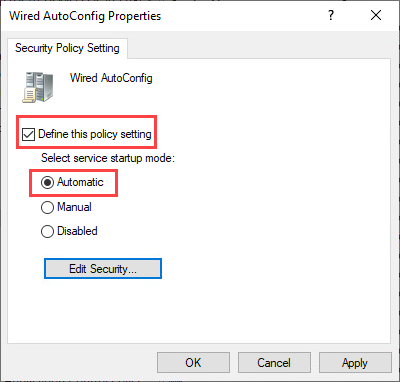
To start the 802.1x service automatically select Define this policy setting and the startup mode to Automatic:
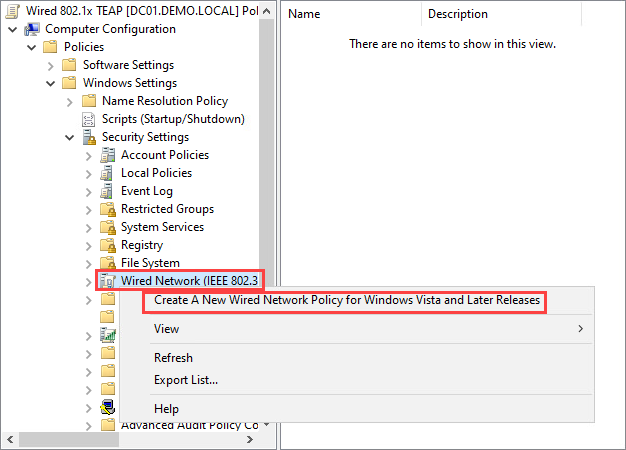
Navigate to Computer Configuration -> Policies -> Windows Settings -> Security Settings. Right click Wired Network (IEEE 802.3) Policies and select Create A New Wired Network Policy for Windows Vista and Later Releases:
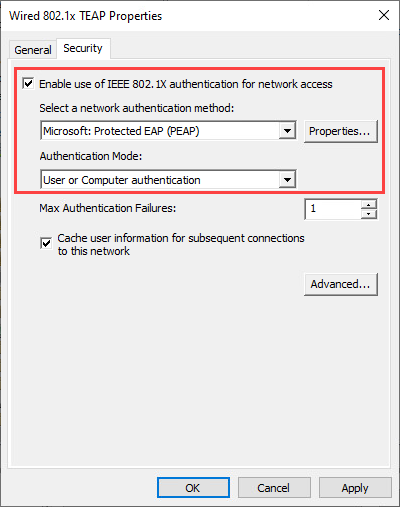
Name the policy and select the Security tab. Check Enable use of IEEE 802.1X authentication for network access and select PEAP as the network authentication method. In the Authentication Mode dropdown choose User or Computer authentication:
Export GPO Settings
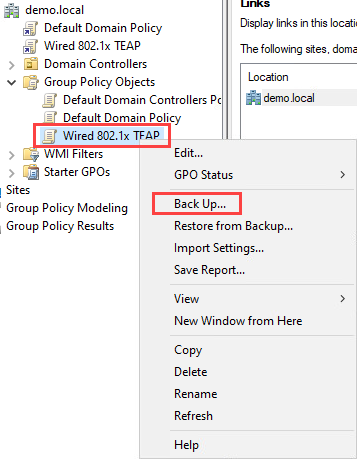
Right click on the policy and select Back Up…:
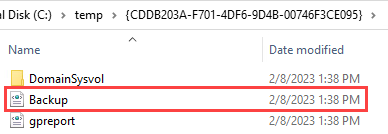
Select your backup location:

Import GPO Settings
Navigate to the folder where you saved the backup and open the Backup.xml file:
In the Backup.xml file replace everything between <EAPConfig> and </EAPConfig> with the config you saved before. Save the edited file.
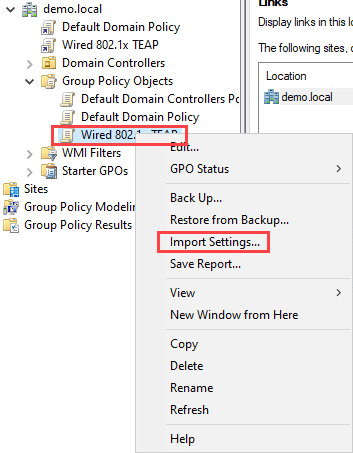
In Group Policy Management right click you policy again and select Import Settings…:
In the new window click Next. You don’t need to backup your policy again. Click Next until you see the Finish button and confirm everything by clicking Finish and OK.
Verify the Group Policy Object
After a successful import navigate to the policy settings again:
Computer Configuration -> Policies -> Windows Settings -> Security Settings -> Wired Network (IEEE 802.3) Policies
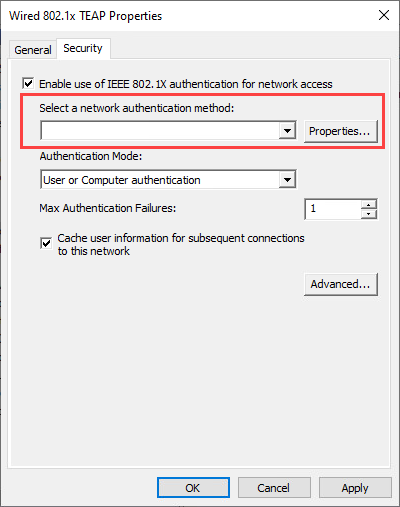
Right click your Policy and select Properties. The authentication method dropdown should now be empty. That’s because you can’t select EAP-TEAP in the dropdown, but the settings will still take effect:
To check if the policy is working as intended. Move to the client and use the following command:
gpupdate /force
Use to following command the check if the policy has been applied to the computer:
gpresult /scope computer /v
The GPO should be listed under Applied Group Policy Objects in the output:
RSOP data for  on WINDOWS-10 : Logging Mode
--------------------------------------------

OS Configuration:            Member Workstation
OS Version:                  10.0.19045
Site Name:                   Default-First-Site-Name
Roaming Profile:
Local Profile:
Connected over a slow link?: No


COMPUTER SETTINGS
------------------
    CN=WINDOWS-10,CN=Computers,DC=demo,DC=local
    Last time Group Policy was applied: 2/9/2023 at 2:51:38 PM
    Group Policy was applied from:      DC01.demo.local
    Group Policy slow link threshold:   500 kbps
    Domain Name:                        DEMO
    Domain Type:                        Windows 2008 or later

    Applied Group Policy Objects
    -----------------------------
        Default Domain Policy
        Wired 802.1x TEAP
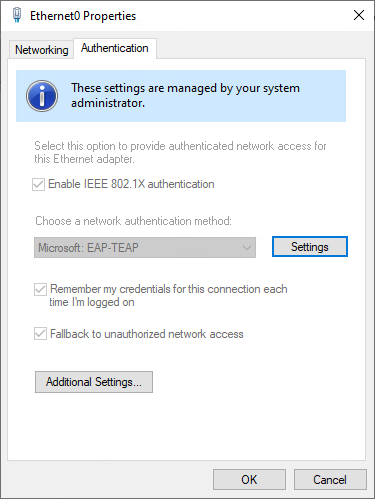
You can also double-check the settings by viewing the Authentication settings of you network interface. Navigate to Control Panel -> Network and Internet -> Network and Sharing Center -> Change Adapter Settings. Right click your adapter and select Properties. Select the Authentication tab. Your settings should look similar to the ones in the screenshot below:
Conclusion
Fortunately TEAP GPOs can be configured on Windows Server 2019 and below. There are just a few extra steps required compared to Windows Server 2022 and above.