Introduction
Even though the Catalyst 2960 series got introduced back in 2005, is in End-of-Sale since October 2014 and End-of-Support since October 2019. They are still used in smaller businesses or lab environments. Therefore a complete reset is sometimes required. For example if you want to reuse your old switch, create a new lab environment or if you run into uncommon problems.
This guide is also valid for the 2960X models, their End-of-Support Date is October 2026. However their End-of-Sale Date is October 2021, but you may still be able to buy used units.
The following provides a simple step-by-step guide to follow along.
Overview
Here you can find an overview of all models supported. Keep in mind that the same commands may still work on older or newer models.
| Model | Release Date | End-of-Sale Date | End-of-Support Date |
|---|---|---|---|
| 2960-24-S | 18. Sep. 2005 | 31. Oct. 2014 | 31. Oct. 2019 |
| 2960-24LC-S | 18. Sep. 2005 | 31. Oct. 2014 | 31. Oct. 2019 |
| 2960-24LT-L | 18. Sep. 2005 | 31. Oct. 2014 | 31. Oct. 2019 |
| 2960-24PC-L | 18. Sep. 2005 | 31. Oct. 2014 | 31. Oct. 2019 |
| 2960-24PC-S | 18. Sep. 2005 | 31. Oct. 2014 | 31. Oct. 2019 |
| 2960-24TC-L | 18. Sep. 2005 | 31. Oct. 2014 | 31. Oct. 2019 |
| 2960-24TC-S | 18. Sep. 2005 | 31. Oct. 2014 | 31. Oct. 2019 |
| 2960-24TT-L | 18. Sep. 2005 | 31. Oct. 2014 | 31. Oct. 2019 |
| 2960-48PST-L | 18. Sep. 2005 | 31. Oct. 2014 | 31. Oct. 2019 |
| 2960-48PST-S | 18. Sep. 2005 | 31. Oct. 2014 | 31. Oct. 2019 |
| 2960-48TC-L | 18. Sep. 2005 | 31. Oct. 2014 | 31. Oct. 2019 |
| 2960-48TC-S | 18. Sep. 2005 | 31. Oct. 2014 | 31. Oct. 2019 |
| 2960-48TT-L | 18. Sep. 2005 | 31. Oct. 2014 | 31. Oct. 2019 |
| 2960-48TT-S | 18. Sep. 2005 | 31. Oct. 2014 | 31. Oct. 2019 |
| 2960X-24PD-L | 24. May 2013 | 31. Oct. 2021 | 31. Oct. 2026 |
| 2960X-24PD-L | 24. May 2013 | 31. Oct. 2021 | 31. Oct. 2026 |
| 2960X-24PS-L | 24. May 2013 | 31. Oct. 2021 | 31. Oct. 2026 |
| 2960X-24PSQ-L | 24. May 2013 | 31. Oct. 2021 | 31. Oct. 2026 |
| 2960X-24TD-L | 24. May 2013 | 31. Oct. 2021 | 31. Oct. 2026 |
| 2960X-24TS-L | 24. May 2013 | 31. Oct. 2021 | 31. Oct. 2026 |
| 2960X-24TS-LL | 24. May 2013 | 31. Oct. 2021 | 31. Oct. 2026 |
| 2960X-48FPD-L | 24. May 2013 | 31. Oct. 2021 | 31. Oct. 2026 |
| 2960X-48FPS-L | 24. May 2013 | 31. Oct. 2021 | 31. Oct. 2026 |
| 2960X-48LPD-L | 24. May 2013 | 31. Oct. 2021 | 31. Oct. 2026 |
| 2960X-48LPS-L | 24. May 2013 | 31. Oct. 2021 | 31. Oct. 2026 |
| 2960X-48TD-L | 24. May 2013 | 31. Oct. 2021 | 31. Oct. 2026 |
| 2960X-48TS-L | 24. May 2013 | 31. Oct. 2021 | 31. Oct. 2026 |
| 2960X-48TS-LL | 24. May 2013 | 31. Oct. 2021 | 31. Oct. 2026 |
Requirements
There aren’t many requirements, but I still want to mention them beforehand.
The only requirement is a console cable and be able to push the Mode button on the switch. That’s it.
Resetting the Switch
Step 1 - Mode Button Location
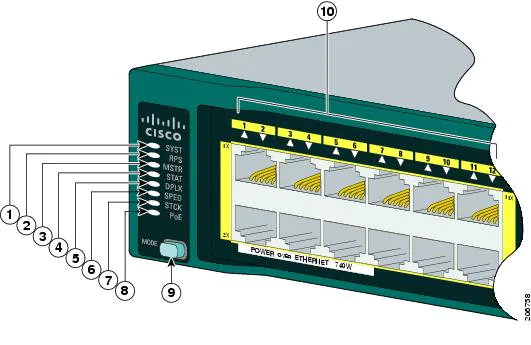
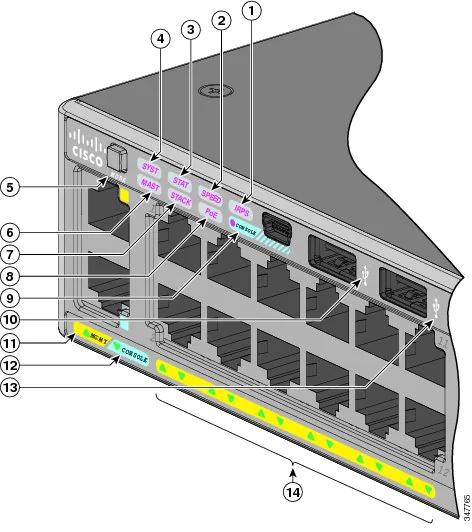
Before you continue refer to the following pictures on where to find the Mode button on your switch model:
Catalyst 2960
Number 9 shows the location of the Mode button on all 2960 models:
 Catalyst 2960 - Source: cisco.com
Catalyst 2960X
Number 5 shows the location of the Mode button on all 2960X models:
 Catalyst 2960X - Source: cisco.com
Step 2 - Press Mode Button
Connect to the switch via console cable and make sure the connection is established.
Power off the switch and hold down the Mode button. While holding down the Mode button power on the switch.
Keep holding down the Mode button!
Hold down the Mode button until you see the following output:
Using driver version 1 for media type 1
Base ethernet MAC Address: 00:00:00:00:00:00
Xmodem file system is available.
The password-recovery mechanism is enabled.
The system has been interrupted prior to initializing the
flash filesystem. The following commands will initialize
the flash filesystem, and finish loading the operating
system software:
flash_init
 boot
switch:
Step 3 - Initialize Flash
To continue you need to initialize the flash file system.
This can be done with the following command:
flash_init
Your output should then look similar to the following:
switch: flash_init
Initializing Flash...
mifs[2]: 10 files, 1 directories
mifs[2]: Total bytes : 1806336
mifs[2]: Bytes used : 612352
mifs[2]: Bytes available : 1193984
mifs[2]: mifs fsck took 1 seconds.
mifs[3]: 0 files, 1 directories
mifs[3]: Total bytes : 3870720
mifs[3]: Bytes used : 1024
mifs[3]: Bytes available : 3869696
mifs[3]: mifs fsck took 0 seconds.
mifs[4]: 5 files, 1 directories
mifs[4]: Total bytes : 258048
mifs[4]: Bytes used : 9216
mifs[4]: Bytes available : 248832
mifs[4]: mifs fsck took 0 seconds.
mifs[5]: 5 files, 1 directories
mifs[5]: Total bytes : 258048
mifs[5]: Bytes used : 9216
mifs[5]: Bytes available : 248832
mifs[5]: mifs fsck took 1 seconds.
 -- MORE --
mifs[6]: 566 files, 19 directories
mifs[6]: Total bytes : 57931776
mifs[6]: Bytes used : 28429312
mifs[6]: Bytes available : 29502464
mifs[6]: mifs fsck took 21 seconds.
...done Initializing Flash.
After the flash initialization is complete you can continue with the next step.
Step 4 - Delete Config Files
To clear the switch configuration we need to delete two files. These are the config.text and vlan.dat file.
If you want to keep the VLAN configuration for example you can simply skip the second step and only delete the config.text file.
Delete config.text
Use the following command to delete the config.text file from the flash directory:
del flash:config.text
Confirm the command with y. Your output should look similar to this:
switch: del flash:config.text
Are you sure you want to delete "flash:config.text" (y/n)?y
File "flash:config.text" deleted
Delete vlan.dat
Use the following command to delete the vlan.dat file from the flash directory:
del flash:vlan.dat
Confirm the command with y. Your output should look similar to this:
switch: del flash:vlan.dat
Are you sure you want to delete "vlan.dat" (y/n)?y
File "flash:vlan.dat" deleted
Step 5 - Reboot
Great, the configuration is now deleted. You need to reboot with the following command:
boot
After the reboot is done you should be greeted with the initial configuration dialogue:
switch: boot
Loading "flash:c2960s-universalk9-mz.122-58.SE2.bin"...
--- System Configuration Dialog ---
Enable secret warning
----------------------------------
In order to access the device manager, an enable secret is required
If you enter the initial configuration dialog, you will be prompted for the enable secret
If you choose not to enter the intial configuration dialog, or if you exit setup without setting the enable secret,
please set an enable secret using the following CLI in configuration mode-
enable secret 0 <cleartext password>
----------------------------------
Would you like to enter the initial configuration dialog? [yes/no]:
% Please answer 'yes' or 'no'.
The resetting process is now complete. You can either continue with the configuration dialog or skip it and start building your new config.
Conclusion
Resetting your switch configuration is not difficult and can be useful in many scenarios. As mentioned before this guide may still be valid for other Cisco Catalyst models.