Introduction
Installing your own ISE appliance can be useful for testing or labbing purposes. There are 90 day demo/evaluation appliances available for VMWare or Hyper-V hypervisors.
ISE also supports KVM hypervisor on Red Hat Enterprise Linux. However, this guide will focus on VMWare. There is not much difference on Hyper-V or VirtualBox for example.
Prerequisites
In order to download or install an ISE appliances you need the following:
- cisco.com account (free and required to download appliance OVA/ISO)
- minimum hardware requirements:
- 4 Cores
- 16GB RAM
- 300GB Disk
For testing purposes with only a few devices the requirements could also be lowered. Even though the disk is thin provisioned by default you should calculate about 70-80GB for a couple of clients. After the installation is completed ISE is already using about 30/35GB of disk space. Lowering CPU or RAM settings may result in a poor performance.
For demonstration purposes I used 2 CPUs and 8 GB RAM on this installation but if possible you should stick with the minimum requirements.
Downloading the Appliance
I recommend using the smallest appliance ISE 3.0 OVA file - 300GB disk for Eval, Small, Medium (Recommend for Evaluation, PSN or PxGrid). If required you can also choose any of the other versions available. The installation process stays the same. If preferred you can also download a ISO version of ISE and create the VM manually. A quick side note: The installation using the ISO might be faster because you can skip the whole import process but requires manual configuration.
Download: software.cisco.com This link may change in the future and there will be newer versions available.
Installation on VMWare ESXi
As already mentioned I will only describe the installation process on VMWare ESXi because it’s very similar on other hypervisors.
OVA Import
Import the OVA file. This can be done by selecting Create/Register VM -> Deploy a virtual machine from an OVF or OVA file. Name your VM and drag and drop or select your ISE OVA file. In the next steps you need to select your Datastore, Network and Deployment type. I choose Eval for this install as mentioned earlier.
Edit Network Interfaces
For our purposes we only need one interface. The remaining ones can be removed for now but feel free to add more later on if necessary for your use case. If you want to avoid extra configuration steps leave the interfaces as they are.
Appliance Configuration
We can now finally boot the appliance.
Shortly after the boot we are greeted with the setup dialogue. Type setup to continue.

In the next steps you need to provide the following information:
- hostname
- IP address
- IP netmask
- IP default gateway
- configure/skip IPv6 settings
- DNS domain
- primary nameserver
- secondary nameserver
- NTP server
- system timezone
- you can look up the correct timezone in the following guide: cisco.com
- an example value would be: America/New_York
- enable/disable ssh service
- username (default admin)
- password
After this is done the setup process starts.
ISE will now try to ping your entered gateway and nameserver. You may want to consider creating the required firewall rules beforehand:

You can skip the check, however this will interrupt the setup process a few times:

After performing the network checks the installation continues:
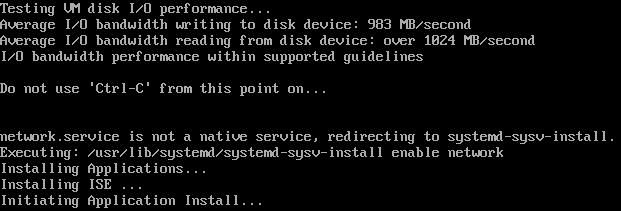
Depending on your hardware the next steps might take a while:
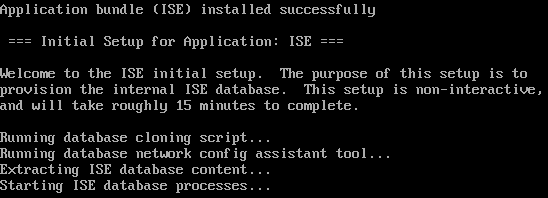
Verify the Installation
Once the installation is finished you will be prompted with a login screen. Go ahead and login with the credentials you defined in the previous step.
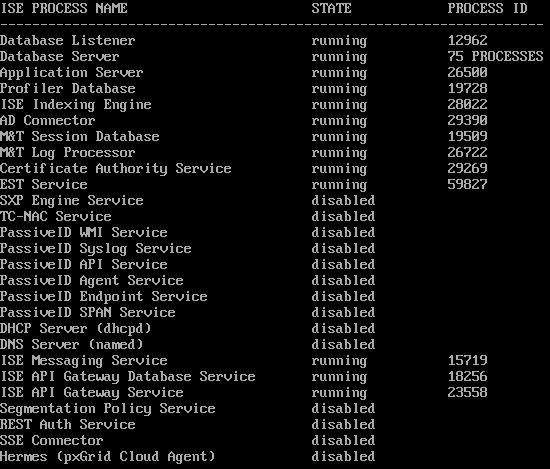
You may wonder why you can’t access the Web GUI (use https://your-ise-ip/) yet but don’t panic. ISE needs some time to start every required service.
You can check the current status with the following command:
show application status ise
For more details use:
show logging application ise-psc.log
In order to access the Web GUI the Application Server needs to be running. If that’s not the case on your installation give it some more time:
Conclusion
Congrats you have now deployed your first Cisco ISE appliance. You can now connect via the Web GUI and lurk through all the available options and settings. Besides some weird “ping checks” the ISE setup is straight forward. This post will be continued with another one where I will show you how to connect a switch to ISE and create your first policy set!